
오늘은 몰랐으면 내일은 알면 된다
[Spring 입문] 3. View 환경설정 본문
현재는 메인페이지가 없기 때문에 localhost:8080 으로 들어가면 에러페이지가 뜨게 된다.
메인페이지를 만들어보자.
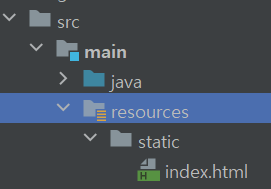
src/main/resources/static/index.html 을 생성한다.
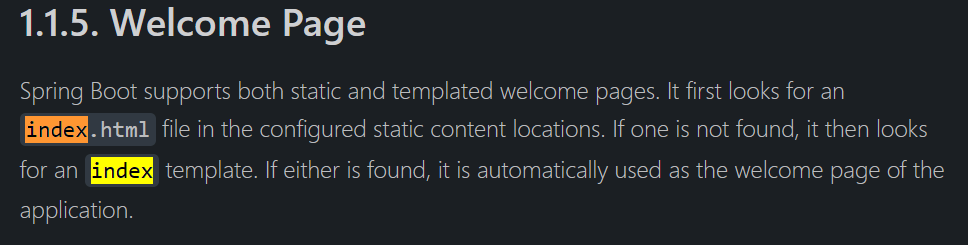
부트에서는 welcome page 기능이 있어서, static 아래에 index.html을 생성하면 해당 파일을 welcome Page로 인식하게 된다.
해당 내용은 spring.io 의 web 메뉴로 들어가면 확인할 수 있다.
개발일을 하면서 느끼는건.. 서칭 능력이 곧 실력이라는 것이다. 어차피 모든 것을 다 알 수는 없다. 그럴 짬바도 안되고 레벨도 안되고... 지금 단계에서 중요한건 찾아보는 습관인듯 하다. 영어라 읽기 까다롭지만 눈에 익히는 연습을 하도록 하자.
https://spring.io/projects/spring-boot#learn
Spring Boot
Commercial support Business support from Spring experts during the OSS timeline, plus extended support after OSS End-Of-Life. Publicly available releases for critical bugfixes and security issues when requested by customers.
spring.io
마찬가지로 공식문서에서 확인을 해보면 템플릿 엔진 몇가지가 소개되어 있는 것을 알 수 있다.
강의에서는 thymeleaf를 사용한다.

어느것을 먼저 만드는지까지는 규칙이 따로 정해진 게 없는 듯 하니 html을 만들고 controller를 만들어보도록 하자.
resources/templates/hello.html 을 생성한다.

그리고 간단한 html 코드를 작성한다.
html 쪽의 코드를 잘 봐두자. 해당 코드가 작성되어야 thymeleaf 엔진을 사용할 수 있다.
<!DOCTYPE HTML>
<html xmlns:th="http://www.thymeleaf.org">
<head>
  <title>Hello</title>
  <meta http-equiv="Content-Type" content="text/html; charset=UTF-8" />
</head>
<body>
<p th:text="'안녕하세요.' + ${data}">안녕하세요~~~</p>
</body>
</html>
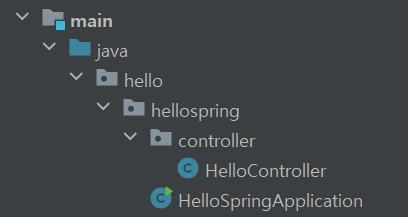
html 이 작성되었으면, hellospring/controller/HelloController.java 를 생성한다.
그리고 간단한 get 메서드를 작성한다.
package hello.hellospring.controller;

import org.springframework.stereotype.Controller;
import org.springframework.ui.Model;
import org.springframework.web.bind.annotation.GetMapping;

@Controller
public class HelloController {

    @GetMapping("hello")
    public String hello(Model model) {
        model.addAttribute("data","hello!");
        return "hello";
    }
}
동작원리는 아래와 같다.

/hello 로 들어가게 되면 boot에 내장되어있는 tomcat을 거쳐 HelloController에서 해당되는 메서드가 실행된다.
컨트롤러에서 return "hello" 라고 문자를 반환하게 되면 spring의 view resolver가 templates 아래에 있는 hello.html 을 찾는다.
부트의 템플릿엔진 기본 viewName 매핑은 다음과 같다.
resources:templates/ + {ViewName} + .html
참고) spring-boot-devtools 라이브러리를 추가하면, html 파일을 컴파일만 하면 서버를 재시작하지 않아도 View 파일 변경이 가능하다.
어떻게 하는지 살펴보자.
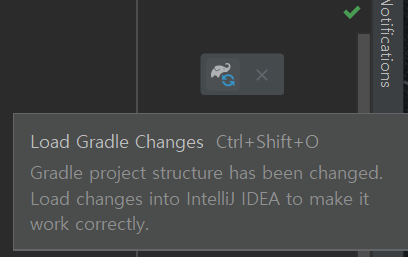
build.gradle 에 다음 코드를 추가한다.
implementation 'org.springframework.boot:spring-boot-devtools'
gradle 변경사항을 Load 한다.

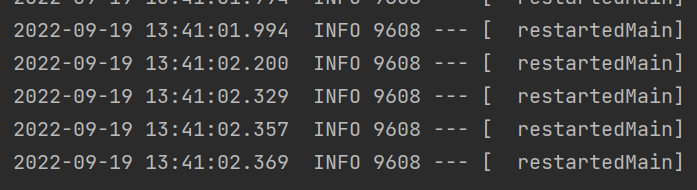
콘솔에 확인을 했을때, restartedMain 이라고 되어있으면 적용이 된 것이다.
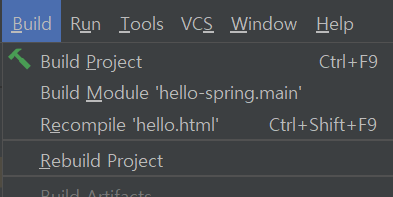
html 을 적당히 변경해준다음 Ctrl+Shift+F9 을 하거나 build -> Recompile을 통해 재컴파일한다.
'Java > Spring' 카테고리의 다른 글
| [Spring 입문] 5. 회원관리 예제(1) 비즈니스 요구사항 정리 (0) | 2022.09.19 |
|---|---|
| [Spring 입문] 4. 정적 컨텐츠, MVC와 템플릿 엔진, API (0) | 2022.09.19 |
| [Spring 입문] 2. 라이브러리 살펴보기 (0) | 2022.09.19 |
| [Spring 입문] 1. 프로젝트 생성(및 IntelliJ JDK 버전 변경) (0) | 2022.09.19 |
| [Spring] 다국어 설정하기 (0) | 2021.04.05 |


